

Jingle bells, jingle bells, jingle all the way,
Oh what fun it is to stitch on a hot and sunny day, hey!!!
In fact, it’s fun to stitch any day so why not start your Christmas preparations with these quick and unique Pocket Bells. Fill them with sweet treats, miniature toys, gift cards or jewellery (hint, hint honey!)

Pocket Bells are completed in just two hooping’s with no sewing required. They can be personalised with names or number them for a jazzy Advent Calendar. Swing them from your Christmas tree or hang them down the chimney to give your loved ones that little extra this year.
Minimum hoop size required – 120mm x 120mm. Design format .vp3 ONLY
Requirements:
For Each bell cut the following fabrics:
- A – 5″ x 2 1/4″ (13cm x 6cm) – Pocket Bottom
- B – 4″ x 1 /2″ (10cm x 4cm) – Pocket Top
- C – 5″ x 2 1/4″ (13cm x 6cm) – Pocket Lining
- D – 5″ x 5″ (13cm x 13cm) – Main Bell
- E – 5″ x 5″ (13cm x 13cm) – Back
- F – 5″ x 6″ (13cm x 15.5cm) – Back
General Requirements:
- 2 x 10” (25cm) square pieces of cutaway stabilizer
- Embroidery threads
- Bobbin Fill
- 15cm piece of ribbon
- 1 bell
- Scissors and general sewing accessories
- Embroidery Machine
Instructions:
1. Retrieve the design ‘Bell Pocket .vp3″.
2. Hoop a layer of stabilizer into the 120×120 hoop.
3. Stitch colour 1 onto the stabilizer.
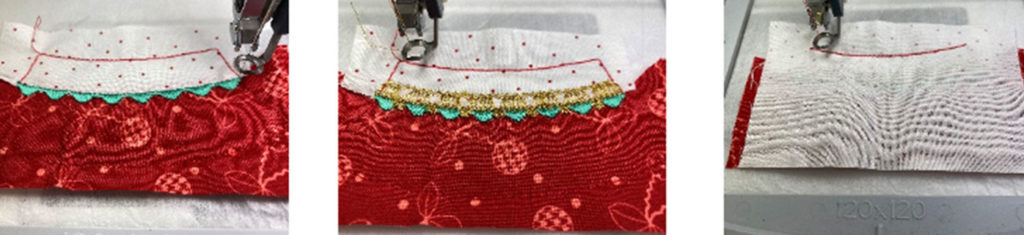
4. Lay fabric piece A over the outline.
5. Stitch colour 2 to hold the fabric in place.

6. Trim away from the top section only.
7. Stitch colour 3 for outline.
8. Lay fabric piece B over the outline
9. Stitch colour 4 to secure.
10. Trim away from the bottom section only.

11. Colour 5 will stitch the satin swag.
12. Colour 6 will stitch the detail.
13. Lay fabric piece C, right sides down, over the design and stitch colour 7.
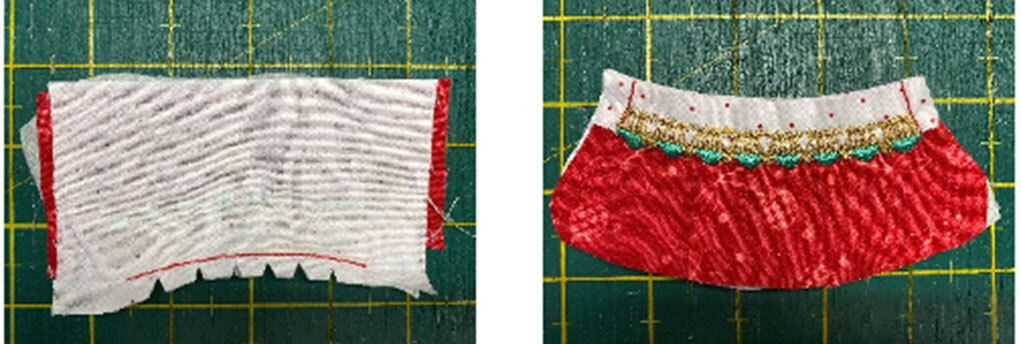
14. Remove the project from the hoop. Remove the excess stabilizer from around the project. Do not remove from behind the project. This provides substance for the bell.
15. Trim back at the top seam approximately 3/8” (1cm) and make cuts for a neater seam.
16. Turn the lining to the back and press in place. Trim around the raw edges approximately 3/8” (1cm) and place this to the side.
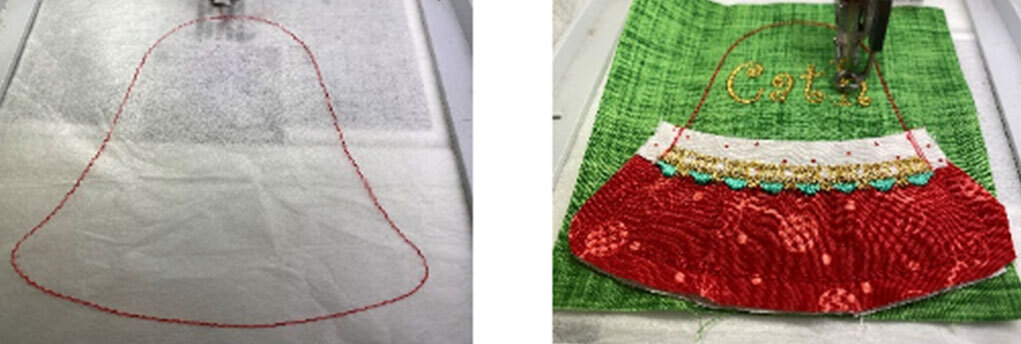
17. Hoop another layer of stabilizer.
18. Stitch colour 8 to give an outline for fabric piece D.
19. Lay fabric piece D over the stitch out and stitch colour 9 to secure.
20. Now is the time to insert and stitch out a name on the bell if desired. This can be done in software prior to stitching out the design or from the machine fonts.
21. Place the pocket over the bottom section of the design, lining up with the side notches.
22. Stitch colour 10 to secure the pocket. I recommend doing this section with the foot control to give more control when stitching over the pocket.
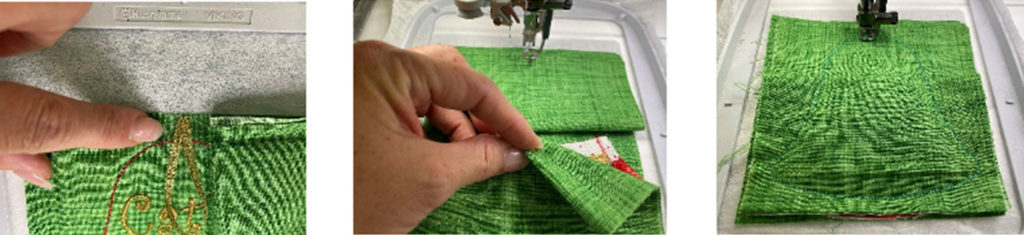
23. Fold the ribbon in half and place it at the top of the bell with the raw edges of the ribbon facing out. Secure with tape.
24. Take fabric pieces E & F. Fold in half so both pieces are still 5” wide.
25. Lay the larger piece F with the fold facing the centre of the bell to the bottom of the design. Lay the smaller piece with the fold facing the centre over the top of the design. Slightly overlap these pieces at the folds.
26. Stitch colour 11 to finish the Pocket Bell.
27. Remove from the hoop and trim away from the edge with either a set of pinking shears or your scissors with nicks at the curves for a better finish.
28. Turn the project right side out, press and fill with tiny gifts to enjoy the festive season.