Looking for a quick project to spruce up your Mother’s Day gift? This In-the-hoop project is perfect to wrap around a bunch of beautiful flowers, plus add a surprise gift into the back of the wrap. This will make Mum’s gift a truly special and unique one to remember.
Requirements:
- 2 x Felt – 9” x 11”
- 1 x Lining Fabric – 8” x 8”
- Tearaway to fit 260×200 Hoop
- 1 x Snap Clip
- Variety of embroidery threads
- Bobbin Fill
- Inspira Cutwork Needles
- PFAFF Size 90 Embroidery Needle
- Fabric Glue Pen
Instructions:
- Hoop a layer of tearaway in the 260×200 hoop only
- Retrieve the design MDWrap.
- Thread a colour the same as the colour of the felt.
- Stitch colour 1 to outline the area for the front felt section on the tearaway only.
- Lay the felt over the outline and stitch colour 2 to hold in place.
- Colour 3 will stitch the wording.
- Colour 4-9 will stitch the flowers & leaves.
- Remove the hoop from the embroidery unit and glue the lining fabric behind the flower outline.
- Return the hoop to the embroidery unit and insert a colour for the blanket stitch. Match the bobbin with the same colour. Stitch colour 10 to secure the flower lining.
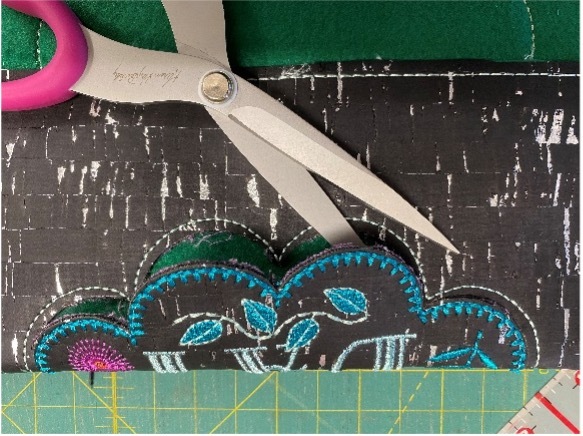
- Remove the hoop from the embroidery unit and cut the excess fabric from around the flower shape. Ensure you do not cut the stitches. Return the hoop to the machine.
- Stitch colour 11 for the blanket stitch around the flower.
- Remove the bobbin and top thread from the machine.
- Colour 12 – Insert Needle 1 (Red) from the Cutwork Needles.
- Colour 13 – Insert Needle 2 (Yellow) from the Cutwork Needles.
- Colour 14 – Insert Needle 3 (Green) from the Cutwork Needles.
- Colour 15 – Insert Needle 4 (Blue) from the Cutwork Needles.
- Remove the hoop from the embroidery unit and glue the second piece of felt to the back of the hoop. This will line up with the first piece of felt on the front.
- Return the hoop to the embroidery unit and stitch colour 16. This will hold the lining in place.
- Thread the machine with the same colour as the front felt. (Same colour as step 3.)
- Stitch colour 17 to form the fold lines and stitch around the outside of the flower.
- Remove the hoop from the embroidery unit and carefully tear the bottom third of the flower wrap away from the stabiliser and fold up behind the hoop as pictured.
- Return the hoop to the machine and stitch colour 18 to hold the fold in place.

- Remove from the hoop and cut approximately 1/8th inch from the outside stitch line.
- Use a sharp pair of scissors to cut along the inside pocket top edge. Carefully cut the tabs to free the cutwork and open the flower.
- Insert the snap clip into the back and fold down the top third of the flower wrap.
- Place a beautiful bunch of flowers and surprise gift into the back of the wrap for your special Mother’s Day gift